Have you ever wanted to create stunning cloud-like effects in your acrylic paint pouring? Well, you’re in luck! The Cloud Effect Acrylic Paint Pouring technique is here to help you achieve beautiful, marbled patterns on your canvas. In this tutorial, the talented artist Erika Tenney shares her step-by-step process for creating a fantasy-style cloud painting using this technique. With a few simple supplies and a little bit of practice, you’ll be able to create your own mesmerizing cloud-inspired masterpiece. So grab your paints and get ready to let your creativity flow!
Cloud Effect Acrylic Pouring
Acrylic pouring is a popular art technique that allows artists to create unique and abstract designs using acrylic paint. One of the most fascinating and beautiful techniques in acrylic pouring is the Cloud Effect. In this article, we will discuss everything you need to know about the Cloud Effect Acrylic Paint Pouring technique, from the supplies you’ll need to the step-by-step process of creating stunning cloud-like effects on your canvas.
Supply List for the Cloud Effect Acrylic Paint Pouring Technique
Before you start creating your own Cloud Effect masterpiece, you’ll need to gather the necessary supplies. Here’s a list of what you’ll need:
- 18″X24″ (or any size you prefer) canvas
- DecoArt Americana Satin Enamel White
- CraftSmart White Acrylic Paint
- LiquiTex Light Blue Permanent, Deep Violet, Mars Black, Phthalocyanine Blue, Prism Violet, Primary Yellow
- Artist Loft Light Violet
- Stir Sticks
- Dixie Cups
Make sure you have all these supplies ready before you begin your Cloud Effect Acrylic Paint Pouring journey.

What is the Cloud Effect Paint Pouring Technique?
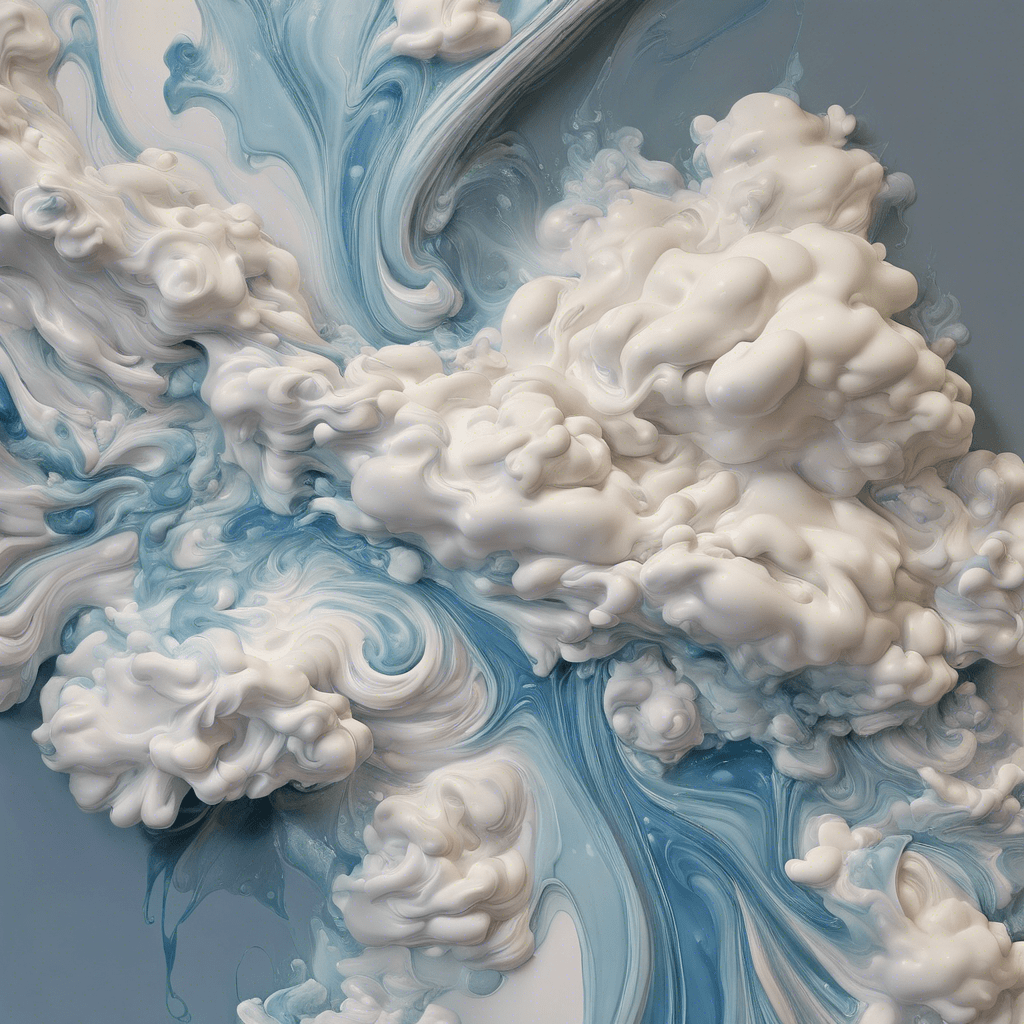
The Cloud Effect is a popular acrylic pouring technique that creates a marbled or swirled effect on a painting surface. It mimics the appearance of clouds or a swirling sky. The technique involves pouring different colors of paint onto a surface in a cup or container, and then flipping or tilting the cup onto the canvas. This causes the colors to flow and mix together, creating unique and mesmerizing patterns.

Paint Mix Guide: How to Mix Paints for a Cloud Pour
To achieve the Cloud Effect, you’ll need to mix your paints in a specific way. Follow this paint mix guide to create the perfect consistency for your pour:
- For each color, mix 1-part acrylic paint with 3-parts pouring medium. This ratio ensures that the paint flows smoothly and creates vibrant patterns on the canvas.
- For white paint, which is essential for creating the cloudy effect, mix equal parts DecoArt Satin Enamel paint and CraftSmart White Acrylic Paint. Then, thin the mixture with pouring medium and water until it reaches the same consistency as the colored paints.
Remember to mix the Satin Enamel paint with the Acrylic paint thoroughly to ensure a smooth and consistent mixture.

How to Create the Cloud Effect Acrylic Paint Pouring Technique
Now that you have your supplies and paint mix ready, it’s time to create your Cloud Effect masterpiece. Here’s a step-by-step guide on how to achieve the Cloud Effect:
- Start by preparing your paints using the Paint Mix Guide mentioned earlier. Take your time with this step to ensure that all the paints are mixed thoroughly and have the right consistency.
- Layer your colored paints and white paint into a pour cup. There’s no specific pattern or design you need to follow for this step. Feel free to experiment with different layering techniques to achieve unique results.
- Optionally, you can cover the edges and corners of your canvas with leftover paint from the pour cup. This adds a cohesive look to your artwork.
- Pour the paints from the cup onto the canvas using the Tree Ring Technique. Take your time with this step and avoid agitating the paints too much to prevent a muddy mess. Slowly tilt the canvas in a circular pattern to allow the paints to flow and create cloud-like patterns.
- Make sure to cover the edges and corners of the canvas if you haven’t done so already. This ensures that the entire canvas is covered with the Cloud Effect.
- Place the canvas on a flat and level surface to dry. To prevent the canvas from sitting in the wet paint, you can elevate it by placing it on Dixie Cups or a similar object.

Finishing and Sealing
After your Cloud Effect acrylic pour has dried, it’s time to finish and seal your artwork. For the best results, we recommend using Rust-Oleum Gloss Crystal Clear Enamel as a sealant. This product provides a glossy finish to your painting and enhances the vibrancy of the colors. You can find this sealant at craft stores, home improvement stores, and online retailers.
Before applying the sealant, make sure to follow the safety precautions listed on the bottle, especially if you’re spraying it indoors. It’s best to spray the sealant outdoors to avoid fumes and overspray.
Once your Cloud Effect Acrylic Paint Pouring masterpiece is complete and sealed, you can proudly display and share your artwork with others. Don’t forget to show off your creation by sharing it on social media or with friends and family. The Cloud Effect is a stunning technique that is sure to captivate anyone who sees it.
So gather your supplies, mix your paints, and let your creativity flow as you create beautiful Cloud Effect acrylic pour paintings. Have fun experimenting with different colors and techniques to discover your own unique style within this mesmerizing art form. Happy pouring!
Best Paint Pouring Supplies

4 thoughts on “Cloud Effect Acrylic Paint Pouring”